ASC Point Spread Function
The point spread function (PSF) represents how an image of a point appears in a microscope. Measuring this PSF can reveal important informations:
- angle of illumination axis
- damage/performance of objective
Having a system with a proper PSF is gets especially important for high resolution and deconvolution work. Analyzing the PSF of an objective can be semi-automated with the "PSF macro" by Laurent Gelman (FMI Basel (Switzerland)).
requirements
- green fluorescent bead sample, preferably sub-resolution (170 nm)
acquisition
- use high resolution objectives (= the ones that people use for high resolution work)
- set up system for z-stack fluorescence
- blue excitation, green detection (i.e. EX 488 nm, EM 500-550 nm)
- pinhole at 1 airy unit
- pixel size of 100 nm
- Z-step size of 200 nm
- 100 planes, focal plane of the bead in the middle
- no oversaturated pixels
- scan field should be located in the center of the field of view (no panning, put the bead roughly in center by eye and stage)
- size of the scan field should not be smaller than 20x20 µm, with the bead in the center (simplifies the analysis)
analysis
- set up LUT and macro file for the PSF macro
PSF Macro
- the macro attempts to crop a 15x15 µm area with the bead in center; if the image dimensions are already smaller, extend the area: Fiji > Image > Adjust > Canvas Size...
install LUT
- Mac: go to applications folder > fiji: ctrl+click on the Fiji(.app) icon > Show package content
- PC: go to \Program Files\Fiji.app (or to the place you installed Fiji)
- create a folder called "luts", if it's not there yet
- drag and drop the *.lut into it
- (re)start fiji
install macro
- Fiji > Plugins > Macros > Install...
- select macro txt file
- macro gets installed to that menu for the current session
load bead stack
- Fiji > File > Open
- select bead stack file
- if necessary, split channels (Fiji > Image > Color > Split Channels)
- if necessary, crop image to a single bead
run macro
description by Laurent
Thanks a lot for your interest in our ImageJ Macro, which I join as an attachment.
You need to install it each time you start ImageJ. Go to >Plugins>Macros>Install...
Select it in the dialog window and click "open".
To run it, you need before to open a stack. We take stacks of 100 planes, spaced by 0.2mm, for all objectives and all microscopes. Then go to >Plugins>Macros>MIPs for PSFs for all microscopes to run the Macro.
Automatic Macro actions / User actions:
A. Selects the plane with the highest pixel intensity, adjusts display settings, opens the information dialog box.
1. Enter information in the dialog window which popped up.
2. Zoom in the image to clearly localize the center of the bead (you can also navigate between planes if needed).
3. Right clicks with the mouse on the center of the bead.
B. Crops the image to get 15mmx15mm area centered over the pixel clicked by the user.
C. Makes projections in X and Y of the stack
D. Stitches together the cropped area and the projections
E. Estimates and subtracts background
F. Takes the square root of the image (to minimize photon noise and to mimic a decrease in histogram gain)
G. Resizes the image to 550x550 pixels, adjusts display, changes LUT and saves the picture in a JPEG format with a standardized name: Date_Scope name_Magnification_NA.jpg.
images

PSF macro: parameters dialog, open bead stack
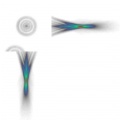
PSF macro result 1: 500 nm bead, confocal
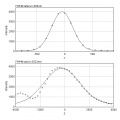
PSF macro result 2: 500 nm bead, confocal


