ASC Point Spread Function
From BioDIP
The point spread function (PSF) represents how an image of a point appears in a microscope. Measuring this PSF can reveal important informations:
- angle of illumination axis
- damage/performance of objective
Having a system with a proper PSF is gets especially important for high resolution and deconvolution work. Analyzing the PSF of an objective can be semi-automated with the "PSF macro" by Laurent Gelman (FMI Basel (Switzerland)).
requirements
- green fluorescent bead sample, preferably sub-resolution (170 nm)
acquisition
- use high resolution objectives (= the ones that people use for high resolution work)
- set up system for z-stack fluorescence
- blue excitation, green detection (i.e. EX 488 nm, EM 500-550 nm)
- pinhole at 1 airy unit
- pixel size of 100 nm
- Z-step size of 200 nm
- 100 planes, focal plane of the bead in the middle
- no oversaturated pixels
- scan field should be located in the center of the field of view (no panning, put the bead roughly in center by eye and stage)
- size of the scan field should not be smaller than 20x20 µm, with the bead in the center (simplifies the analysis)
prepare PSF macro
- download the PSF macro zip file and unzip it
- include the LUT:
- Windows: locate the Fiji.app folder (i.e. C:\Program Files\Fiji.app), create a folder luts inside (if it's not there yet), place the LUTforPSFs.lut there
- Mac: locate the Fiji.app folder (i.e. Applications\Fiji), right click on it > Show package content, create a folder luts (if it's not there yet), place the LUTforPSFs.lut there
- install the macro:
- open Fiji
- Plugins > Macros > Install...
- the macro appears in the Macros menu
- procedure has to be repeated for every new Fiji session
analysis
- load the bead stack into Fiji
- make sure the metadata is still there (i.e. that the image is scaled)
- check the pixel size: Image > Show Info > Voxel size X
- if necessary, crop image to a single bead (but also consider the next point)
- the macro attempts to crop a 15x15 µm area with the bead in center; if the image dimensions are smaller, extend the area with black: Fiji > Image > Adjust > Canvas Size...
- if necessary (multi-channel data), split channels (Fiji > Image > Color > Split Channels)
- zoom into the image, in a way that you can hit the center of the bead w/o problems
- start the macro: Plugins > Macros > gelman-psf-macro-v4
- enter the microscope information and click OK
- right-click into the center of the bead
- that's the tricky step: the analysis will be wrong if you don't hit the center
- depending on the system configuration you might need to first right-click into the center, and then left-click on the image window to get the process startet
- wait for the analysis to be done, result will be a stack of 2 images (see examples below)
PSF macro overview: automatic macro actions / user actions
by Laurent Gelman
- A. Selects the plane with the highest pixel intensity, adjusts display settings, opens the information dialog box.
- 1. Enter information in the dialog window which popped up.
- 2. Zoom in the image to clearly localize the center of the bead (you can also navigate between planes if needed).
- 3. Right clicks with the mouse on the center of the bead.
- B. Crops the image to get 15mmx15mm area centered over the pixel clicked by the user.
- C. Makes projections in X and Y of the stack
- D. Stitches together the cropped area and the projections
- E. Estimates and subtracts background
- F. Takes the square root of the image (to minimize photon noise and to mimic a decrease in histogram gain)
- G. Resizes the image to 550x550 pixels, adjusts display, changes LUT and displays the picture with a standardized name: Date_Scopename_Magnification_NA
images

PSF macro: parameters dialog, open bead stack
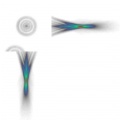
PSF macro result 1: 500 nm bead*, confocal
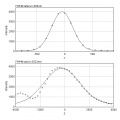
PSF macro result 2: 500 nm bead*, confocal


(*) 500 nm bead = still above resolution limit! Use 170 nm beads to get a proper PSF.